Have you ever wanted your own server at home to run applications, host files, or experiment with new technologies? A homelab is the perfect way to do just that. But what about accessing your homelab securely from anywhere in the world? That’s where things can get complicated.
In this guide, I’ll walk you through setting up a powerful and secure homelab using a combination of Fedora Server, Teleport, and Cloudflare Tunnels. We’ll cover everything from the initial OS installation to configuring secure remote access and even integrating your favorite web applications. By the end of this tutorial, you’ll have a fully functional homelab that you can securely access from anywhere, without the need for a VPN.
We can use this homelab later to host our kubernetes or openshift experiments.
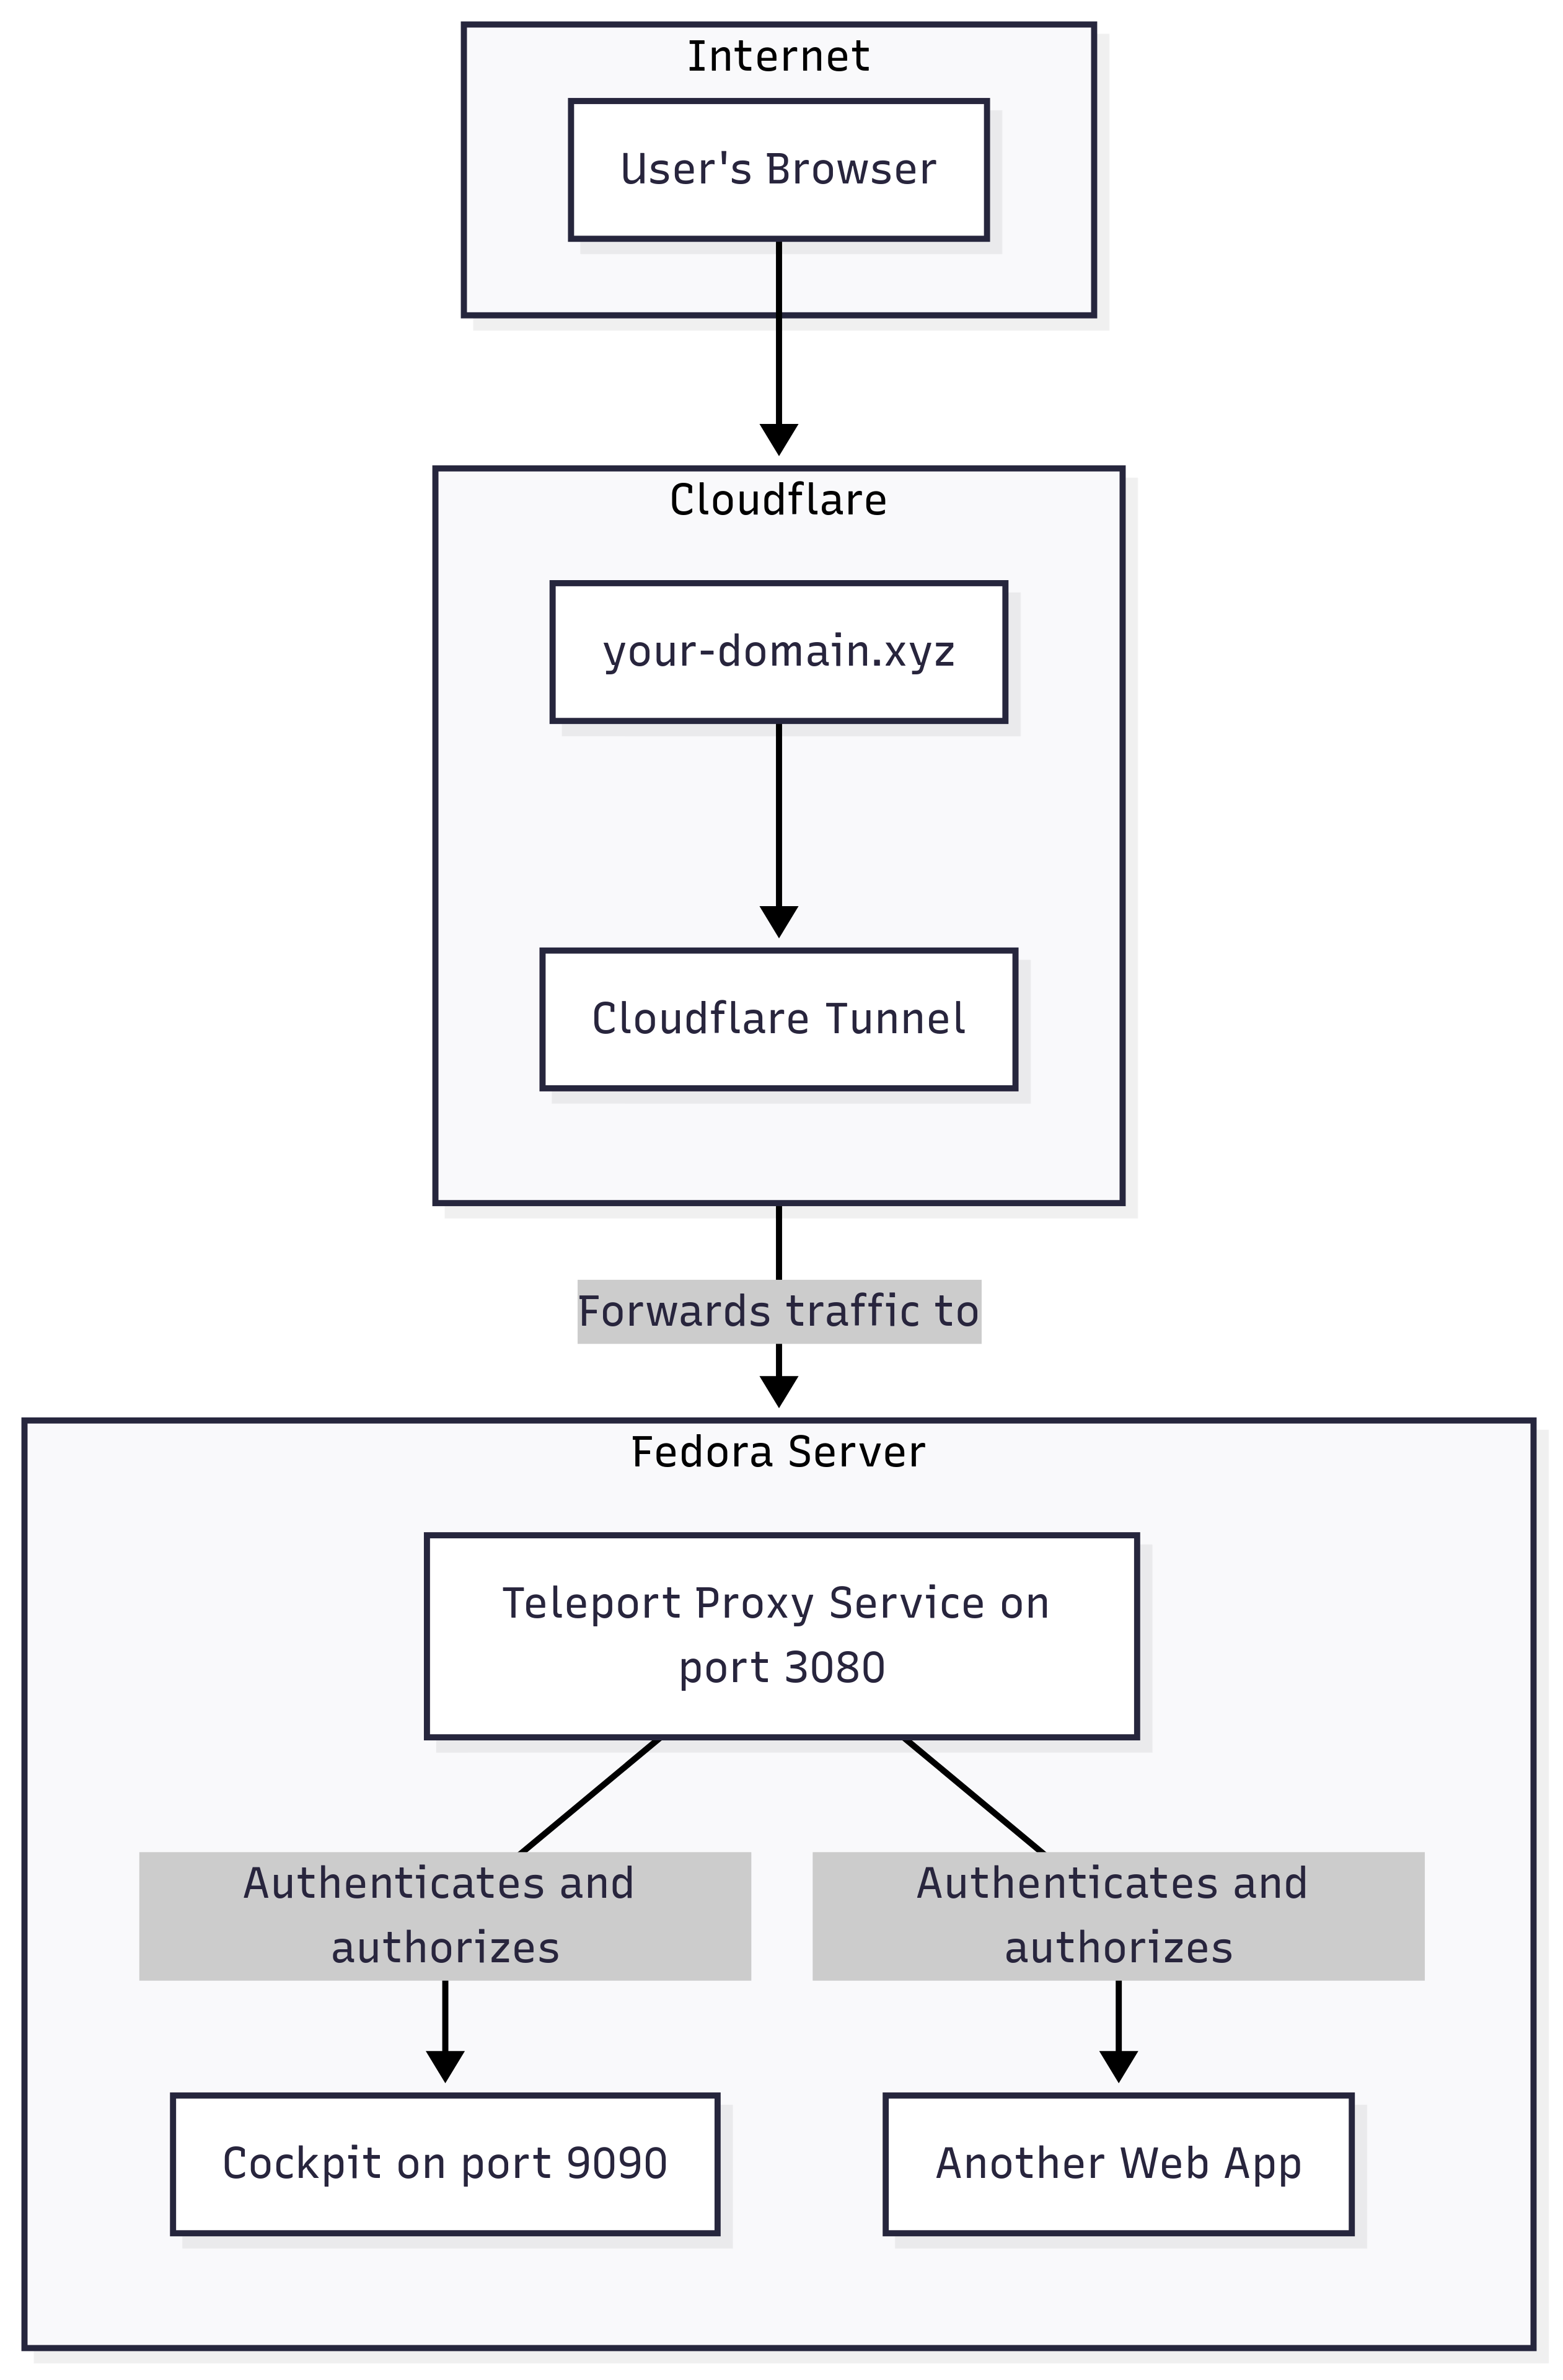
Here is a high-level look at how all the pieces fit together. The user connects to your domain, which is managed by Cloudflare. Cloudflare Tunnel securely forwards the traffic to the Teleport Proxy service running in your homelab, which then authenticates the user and grants access to internal applications like Cockpit.
First, we need to set up the base operating system and install Teleport.
Install Fedora Server: Start by installing a fresh copy of Fedora Server (this guide used version 42) on your dedicated machine. I used this guide, I would suggest using Fedora Media Writer to flash the ISO to your USB for a smooth experience. Ventoy is also a solid choice.
Install Teleport: Once Fedora is running, install the Teleport OSS package using the official install script.
Part 2: Exposing Teleport with Cloudflare Tunnels
#
Next, we’ll use Cloudflare Tunnels to securely expose your Teleport instance to the internet.
Set up Your Domain: Purchase a domain through Cloudflare or a third-party registrar like Namecheap. If you use a third party, add your domain to your Cloudflare account and follow the steps to manage its DNS there.
Create a Cloudflare Tunnel: Navigate to the Zero Trust dashboard in Cloudflare. Go to Access -> Tunnels and create a new tunnel.
Install cloudflared: Follow the instructions to install the cloudflared service on your Fedora server. This service creates a secure, outbound-only connection to Cloudflare’s network.
Route Traffic to Teleport: We need to configure the tunnel to route traffic to your Teleport web console, which runs on https://localhost:3080 by default. Create a public hostname for your tunnel that points to this local service.
Update Teleport’s Public Address: Edit /etc/teleport.yaml and set the public_addr to your domain. This tells Teleport what its public-facing address is.
Now, let’s configure Single Sign-On (SSO) with GitHub to secure access to Teleport.
Create a GitHub OAuth App: Go to your GitHub developer settings (https://github.com/settings/developers) and create a new OAuth application.
Optionally, create a GitHub organization and a team within it for managing access. This guide uses an organization called “Aditya-Homelab” and a team called “admin”.
Create GitHub Connector Configuration: Create a new file named github-auth.yaml with the following content. Replace the client_id, client_secret, and other values with your own.
Apply the Connector: Use tctl to create the new authentication connector.
sudo tctl create -f github-auth.yaml
Add User to Teleport Role: Add your Linux user (e.g., fedora) to the access role in Teleport. This allows the user to log in to the server via Teleport.
Part 4: Accessing Internal Web Apps via Teleport
#
One of the biggest advantages of Teleport is its ability to provide secure access to internal web applications. This creates a single, authenticated entry point for all your services without needing a VPN.
As an example, we’ll add Cockpit, a web-based server management interface that is installed by default on Fedora Server and accessible at http://localhost:9090.
Add the Application to Teleport: Edit /etc/teleport.yaml and add the application to the app_service section.
Configure Wildcard DNS: Teleport makes apps available at subdomains (e.g., cockpit.your-domain.xyz). For this to work, we need a wildcard DNS record.
In your Cloudflare Tunnel, add another public hostname with a wildcard subdomain (*.your-domain.xyz) pointing to your Teleport service (https://localhost:3080).
This does not automatically create the DNS record. Go to your domain’s DNS settings in Cloudflare and create a CNAME record with * as the name, pointing to your tunnel’s domain (your-domain.xyz).
Update Cockpit’s Configuration: By default, Cockpit only allows access from the local machine. We need to allow access from our domain. Edit /etc/cockpit/cockpit.conf and add the following:
[WebService]Origins=https://*.your-domain.xyz
Restart Cockpit:
sudo systemctl restart cockpit.service
You should now be able to access Cockpit through the Teleport dashboard.
Teleport can even handle authentication for the web apps it protects. Here’s a simple example of how to automatically log in to Cockpit as the fedora user.
Generate Basic Auth Header: We’ll use basic authentication. First, create a base64-encoded string of username:password.
echo -n "fedora:yourpassword"| base64
Update Teleport App Configuration: Modify the app configuration in /etc/teleport.yaml to add the Authorization header to every request.
Now, Teleport will automatically authenticate you as the fedora user when you access Cockpit. This was a simple example, but Teleport also supports passing JWT tokens for more advanced OIDC-based authentication.
If you find that Teleport starts before Cockpit or the Cloudflare Tunnel is ready, you can force it to wait. This ensures that your web apps are accessible immediately after a reboot.
Open the systemd override file for the Teleport service.
sudo systemctl edit teleport.service
Add the following lines to make Teleport start after the other required services.
Congratulations! You’ve successfully set up a secure and remotely accessible homelab with Fedora, Teleport, and Cloudflare. You now have a single, secure entry point to all your self-hosted applications, complete with SSO authentication.
From here, the possibilities are endless. You can add more applications to Teleport, explore its other features like SSH access and Kubernetes integration, or set up monitoring for your new homelab. Happy labbing!
Fedora Homelab -
This article is part of a series.
Introduction # In this part, we will attack the Windows 11 machine (target-pc) from our Kali machine and also use Atomic Red Team on the target-pc to simulate various attacks. We’ll then analyze the logs generated in Splunk to see how these attacks appear in the data.
Homelab: Splunk+Active Directory
·2356 words·12 mins
Introduction # In the world of cyber-security, having hands-on experience is invaluable. A home lab setup offers a powerful sandbox to simulate real-world network environments and security incidents. Active Directory (AD) and Splunk are two of the most widely used tools in the industry, forming the backbone of network management and security monitoring in countless organisations.
Project: File Integrity Monitor
·1040 words·5 mins
CIA Triad # Before we jump into the project let’s understand why something like a File Integrity Monitor is required, for this we will need to understand the CIA triad. The CIA triad is a fundamental model in information security that stands for Confidentiality, Integrity, and Availability. This project will focus on the Integrity part.